Frustration... and the cure for it.
In the spirit of bad news first, good news last, I present you with the Story Of Shorts.
In my sewing class last night I began making my shorts. I took the pattern out, and, after measuring myself around and front to back (from what my teacher calls the 'sweet spot' between your legs. Yes, I find that disturbing, if only because she's a conservative, dress wearing home ecc teacher.) I determined that I needed my shorts a bit larger than the pattern. So I traced out the pattern on butcher paper*, and made it an inch bigger all the way around.
*did you know you can draw on top of that pattern-piece-onionskin paper with a permanent marker and it will go through to the butcher paper? O_o On the upside, it is easier than trying to see the lines with the butcher paper on top...
It seemed really big. Like... Butt that ate Manhattan big. Like Buttzilla big. But (hee hee hee) I decided that the pattern itself looked big, even for the smaller sizes. So I lay out my fabric, and cut the pattern. So far, so good.
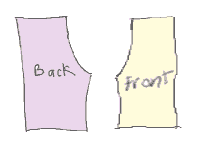
Teacher shows me how to match one front and one back, and sew up the leg. I do so, using the serger (love love love sergers! I've got to figure out how to use mine!).

Then I take it to the teacher for help with the next step. Because I'm using a McCall's pattern, the illustration doesn't show all the steps, and the text was confusing.
So the teacher shows me how to pin the two sides together, and tells me to sew the center seem. I baste it together, and then serge it up.
At some point, I start to think something is wrong, but I figure the teacher knows what she's talking about. So I sewed the red line to the purple line (below).
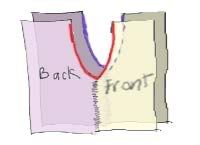
So, that's basted and sewn, and I'm thinking that I've done something horribly wrong. I take it to the teacher, and she laughs and says yes, you've sewn it wrong.
Grumble grumble grumble. I did what she told me to... So I sit and rip, rip rip out serger stitching. Teach said she'd show me the 'easy way' to do it, but then didn't. That's ok; I figured it out myself, and was 'unzipping' the surger stitch after trying for more than 15 minutes. So, after more than 45 minutes, I get it back to four pieces.
I plunk the pattern down on the cutting table, lay my pieces out, and look hard at it. I believe I did step one correctly. I'm not sure what else I could DO in step two. I have this horrible feeling that I had done it correctly, and she made me rip it out because she didn't realize that. I left class with nothing but my pattern cut out after 4 hours of sewing class. I am very, very frustrated.
Any seamstress/seamstress out there? What did I do wrong? Should I sew the red line to the purple? Or what? The directions aren't helping me here, and neither is my teacher.
After stomping home (ok, I drove, but I was driving petulantly), I found my secret Pal had sent me a package!
2 skeins of Regina sock yarn, in a super cool black with color pops, a sock booklet, a knit booklet, and CANDY. Oh sweet baby Jesus, candy. Secret pal, you have no idea how welcome those mini mars bars were! Chocolate is the perfect panacea... Thank you!! You saved my night.
posted by Lindsey @ 8:51 AM
3 comments
![]()


3 Comments:
if I am following your sketch correctly, you first sewed the straight line under the curve of the front pieces to the straight line under the curve of the back pieces.
your instincts were correct - that was not right. those were the legs.
the curved lines form the arc from the front waist, through your legs, and up to the back waist.
so you first need to sew the curved lines of the two fronts together and the curved lines of the two back pieces together.
you will then have a single front piece and a single back piece, neither of which are completely flat because they have that sort of triangular extension that goes under your crotch
HTH
I have sewen a lot of pants and shorts in my life and after a few times through your drawing realize that what you did was right, I just would not have done it in that order. Go back to your 4 pieces. Put the right front with right back. Do the same with the lefts. Putting the left front and back right-sides together sew the outside leg seem and then inside leg seem. Repeat with the right side. You now have two tubes. Flip one of these tubes inside out. Take the other one and slide it inside this one. Now you have right sides together but it looks like one tube. Line up the two center crotch seams and the top of the waist band on the front and back. The pieces should line up. Sew this seam. You now have the basis for shorts. Hope this helps.
Catherine
I am so glad I was able to help with the candy because I would be of no help with the sewing...
Good Luck with the shorts.
Your Secret Pal
Post a Comment
<< Home